Where to put highlighter on face is the most essential technique every makeup enthusiast needs to master for that coveted luminous glow.
Highlighter has evolved from a simple makeup product into an art form that can completely transform your appearance by strategically enhancing your natural features.
In 2026, highlighting techniques have become more sophisticated, with customized approaches for different face shapes, skin types, and occasions.
Table of Contents
Understanding Highlighter and Its Purpose
Highlighter is a light-reflecting makeup product designed to create dimension and luminosity on your face. It works by catching and bouncing light off specific areas, making them appear more prominent and radiant.
The science behind highlighter involves microscopic reflective particles that create an optical illusion. When light hits these particles, they scatter the rays, creating that signature glow everyone loves.
In 2026, highlighter formulations have become more advanced than ever. Brands now incorporate skincare ingredients like hyaluronic acid, vitamin E, and peptides directly into highlighter formulas for dual benefits.
The High Points Theory: Where Light Naturally Hits
The fundamental rule for where to put highlighter on face follows the “high points” principle. These are areas where natural light would hit your face if you were standing in the sun.
Think about how sunlight illuminates your features. Your cheekbones, nose bridge, and forehead center naturally catch light first. Highlighter mimics this natural phenomenon artificially.
Professional makeup artists call this technique “light mapping.” By understanding your face’s natural light patterns, you can enhance your bone structure and create a three-dimensional effect.
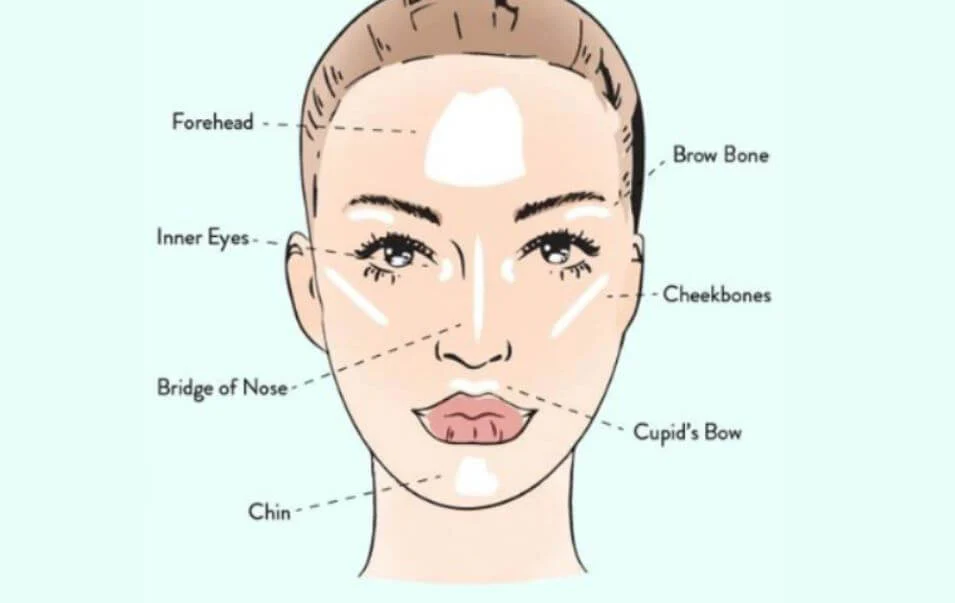
The 9 Essential Places to Put Highlighter on Face
1. Upper Cheekbones (The Most Popular Spot)
The cheekbones are undoubtedly the most popular location for where to put highlighter on face. Apply highlighter to the highest point of your cheekbones, starting from the apple of your cheeks and sweeping toward your temples.
This placement lifts your entire face and creates a youthful appearance. Use a “C” shape motion, following the natural curve of your cheekbone for the most flattering effect.
For extra dimension, apply your highlighter just above your blush. This layering technique creates depth and prevents your makeup from looking flat or one-dimensional.
2. Bridge of the Nose
Applying highlighter down the bridge of your nose creates an elongating, slimming effect. Start from between your eyebrows and sweep down to the tip, using a light hand.
This technique is especially flattering in photographs. It makes your nose appear straighter and more refined without obvious contouring.
Avoid applying highlighter to the sides of your nose or the tip. These areas can make your nose appear wider or draw attention to unwanted features.
3. Cupid’s Bow (Above Upper Lip)
Highlighting your cupid’s bow creates the illusion of fuller, more defined lips. Apply a small amount of highlighter to the “v” shape above your upper lip.
This technique works beautifully when paired with lip gloss. The combination creates an irresistible pout that catches light from every angle.
Use a precision brush or your fingertip for this delicate area. Blend gently to avoid harsh lines that can look unnatural.
4. Inner Corner of Eyes
The inner corners of your eyes benefit tremendously from a touch of highlighter. This placement brightens your entire eye area and makes you look more awake and refreshed.
Apply a small dot of highlighter right next to your tear ducts. Blend gently with your ring finger for the most natural effect.
This technique is particularly effective for counteracting tired eyes or dark circles. It draws attention away from shadows and toward the light.
5. Under the Brow Bone
Applying highlighter just beneath your eyebrows creates a lifting effect that opens up your eyes. Follow the natural arch of your brow, focusing on the highest point.
This placement makes your eyebrows appear more defined and your eyes larger. It’s a favorite trick of makeup artists for editorial and runway looks.
Use a small, precise brush for this area. The goal is a subtle highlight that accentuates your brow shape without looking obvious.
6. Center of Forehead
A touch of highlighter at the very top center of your forehead adds dimension to your face. Apply it sparingly in a small vertical line or dot.
This placement prevents your face from looking flat in photographs. It’s especially important for video calls and professional headshots.
Don’t overdo this area, as too much highlighter on the forehead can appear shiny rather than glowy. A light hand is essential.
7. Center of the Chin
Highlighting the center of your chin creates balance and draws attention to the lower part of your face. Apply a small amount to the most prominent part of your chin.
This technique works especially well when you’ve also highlighted your cheekbones and nose bridge. It creates a cohesive, balanced look.
For those with oily skin, consider using a matte highlighter on the chin to avoid excess shine while still achieving dimension.
8. Décolletage and Collarbones
Don’t stop at your face! Highlighting your collarbones and décolletage creates a cohesive, glowing look. Apply highlighter along the collarbone, following its natural curve.
This technique is perfect for special occasions, photoshoots, or any time you’re wearing an outfit that shows your shoulders or chest.
Body highlighters typically come in larger formats and more intense finishes. They’re designed to withstand movement and last through dancing or long events.
9. Down the Center of the Nose (Advanced Technique)
For those wanting extra definition, a thin line of highlighter down the entire center of your nose creates a sculpted effect. This technique requires precision and careful blending.
Start between your eyebrows and continue to just before the tip of your nose. The line should be very thin—about the width of a cotton swab.
This advanced placement works best for photography and special events. It can look too intense for everyday wear if not blended perfectly.
Choosing the Right Highlighter Formula for Your Skin Type
Powder Highlighter
Powder highlighters work best for oily and combination skin types. They’re buildable, easy to control, and less likely to slide around throughout the day.
Apply powder highlighter with a fluffy fan brush or tapered highlighting brush. Tap off excess product before applying to avoid chunky application.
In 2026, finely-milled powder highlighters have become incredibly sophisticated. They blend seamlessly and provide everything from subtle sheens to intense metallic finishes.
Cream Highlighter
Cream highlighters are ideal for dry and mature skin. They blend beautifully into the skin and provide a dewy, natural-looking finish.
Apply cream formulas with your fingers, a damp beauty sponge, or a dense stippling brush. The warmth of your fingers helps the product melt into your skin.
Cream highlighters can be applied before or after powder products. Many makeup artists use the “underpainting” technique, applying cream highlighter before foundation for an ultra-natural glow.
Liquid Highlighter
Liquid highlighters offer the most versatility. They can be mixed with foundation, applied alone for a natural glow, or layered with powder highlighter for intensity.
Dispense liquid highlighter onto the back of your hand first. Then use a damp sponge or your fingers to dab it onto your high points.
Liquid formulas are perfect for achieving that “glass skin” look that’s trending in 2026. They create an almost wet-looking finish that photographs beautifully.
Stick Highlighter
Stick highlighters combine convenience with precision. They’re travel-friendly and allow for targeted application exactly where you want it.
Apply stick highlighters directly to your skin, then blend with your fingers or a brush. They work particularly well for quick touch-ups throughout the day.
The newest stick formulas twist up like lipstick and glide on smoothly without tugging. They’re perfect for beginners learning where to put highlighter on face.
Selecting the Perfect Highlighter Shade for Your Skin Tone
Fair to Light Skin Tones
If you have fair skin, opt for highlighters in champagne, pearl, or soft pink shades. These colors enhance your natural complexion without looking harsh.
Avoid highlighters that are too dark or bronze-toned. They can appear muddy on fair skin and create an unnatural contrast.
Iridescent pink highlighters are particularly flattering on fair skin with cool undertones. They add a youthful, ethereal glow.
Medium Skin Tones
Medium skin tones look stunning with gold, rose gold, and peachy-champagne highlighters. These warm shades complement the natural warmth in medium complexions.
You have the most versatility with medium skin. You can wear both warm and cool-toned highlighters depending on your undertone and desired effect.
For everyday wear, stick with subtle gold tones. For evening glamour, try deeper bronze or copper shades for more drama.
Tan to Deep Skin Tones
Tan and deep skin tones shine in rich gold, bronze, and copper highlighters. These deeper shades show up beautifully and create stunning dimension.
Avoid highlighters that are too light or silvery. They can create an ashy appearance rather than a natural glow.
In 2026, brands have finally created extensive highlighter ranges for deeper skin tones. Look for intense, pigmented formulas that won’t disappear on your complexion.
Understanding Undertones
Your skin’s undertone matters just as much as your overall skin tone. Cool undertones (pink/blue veins) look best in silver, pink, and icy champagne highlighters.
Warm undertones (green veins) are flattered by gold, bronze, and peachy highlighters. These shades enhance the natural warmth in your skin.
Neutral undertones (blue-green veins) can wear almost any highlighter shade. Experiment with different colors to find your favorites.
How to Apply Highlighter: Step-by-Step 2026 Technique
Step 1: Prepare Your Skin
Start with clean, moisturized skin. Proper hydration is crucial for achieving that lit-from-within glow everyone desires.
Apply your favorite primer to create a smooth canvas. In 2026, luminous primers have become incredibly popular as they enhance highlighter’s effect.
Allow your skincare to fully absorb before applying makeup. Rushing this step can cause products to pill or separate.
Step 2: Apply Your Base Makeup
Complete your foundation and concealer application before reaching for highlighter. Your base should be even and well-blended.
Set your foundation only in areas that tend to get oily. Avoid setting the high points of your face where you’ll apply highlighter.
If you want an all-over glow, mix a drop of liquid highlighter into your foundation before applying. This creates a radiant base.
Step 3: Apply Highlighter Strategically
Now comes the fun part—applying highlighter where to put highlighter on face matters most. Start with the cheekbones, as this is the most forgiving area.
Build intensity gradually. It’s much easier to add more highlighter than to remove excess product.
Work in natural light whenever possible. Artificial lighting can be deceiving and lead to over-application.
Step 4: Blend Like a Professional
Blending is the secret to natural-looking highlighter. Use gentle circular motions or light tapping motions to diffuse harsh edges.
For powder highlighter, use a clean fluffy brush to blend. For cream or liquid, use a damp beauty sponge or your fingertips.
Check your makeup from multiple angles. Step back from the mirror to ensure your highlighter looks natural and well-blended.
Step 5: Set (Strategically)
If using powder highlighter, you can skip setting spray on those areas. The powder is already set and adding spray might dull the effect.
For cream or liquid highlighters, a light mist of setting spray will lock them in place. Hold the bottle 10-12 inches from your face.
Avoid applying setting powder over highlighter. This will completely defeat the purpose and eliminate your glow.
Customizing Highlighter Placement for Your Face Shape
Oval Face Shape
Lucky you! Oval faces are considered the most balanced shape. You can follow the standard highlighting map without much modification.
Focus on enhancing your natural cheekbones and keeping everything balanced. Highlight the high points without overemphasizing any particular feature.
Apply highlighter in a “C” shape from temples to cheekbones for the most flattering effect on oval faces.
Round Face Shape
For round faces, the goal is to create the illusion of length and definition. Focus highlighter on the upper cheekbones, sweeping toward the temples.
Avoid highlighting the apples of your cheeks or the center of your forehead. These areas can make round faces appear wider.
A thin line of highlighter down the bridge of your nose helps elongate round faces. Keep it subtle and well-blended.
Square Face Shape
Square faces benefit from highlighter that softens angular features. Focus on the center of the forehead, cheekbones, and chin.
Blend highlighter in circular motions rather than harsh lines. This creates softness and diminishes the appearance of strong angles.
Avoid highlighting the corners of your jawline or temples. This can emphasize the squareness you’re trying to soften.
Heart-Shaped Face
Heart-shaped faces should focus highlighter on the center of the face. Apply to the cheekbones, nose bridge, and cupid’s bow.
Go light on forehead highlighting. Heart-shaped faces already have wider foreheads, so you don’t want to draw more attention there.
Emphasize your chin with a touch of highlighter. This creates balance between your wider forehead and narrow chin.
Long/Oblong Face Shape
Long faces benefit from horizontal highlighting placement. Focus on the cheekbones, extending outward toward the temples.
Avoid highlighting down the center of your nose or forehead. Vertical highlights will make long faces appear even longer.
Apply highlighter to the tip of your chin and the center of your forehead in small, horizontal motions to add width.
Diamond Face Shape
Diamond faces should highlight the cheekbones—your best feature. Apply highlighter generously to the upper cheekbones.
Add a touch to your chin and forehead center to balance your narrow forehead and chin with your wider cheekbones.
Avoid highlighting your temples. This area is already prominent on diamond faces and doesn’t need extra emphasis.
Common Highlighter Mistakes to Avoid in 2026
Using Too Much Product
The number one mistake people make is over-applying highlighter. What looks subtle in your bathroom mirror might look like a disco ball in natural light.
Start with a tiny amount and build gradually. Remember, you can always add more, but removing excess highlighter is difficult.
In 2026, the trend has shifted toward more natural, skin-like highlighting rather than intense, blinding highlight.
Choosing the Wrong Shade
Wearing a highlighter that doesn’t complement your skin tone ruins the entire effect. It can look ashy, muddy, or completely unnatural.
Always test highlighter in natural lighting before purchasing. What looks perfect in store lighting might look completely different outside.
Don’t be afraid to mix highlighter shades. Combining two colors can create the perfect custom shade for your skin tone.
Skipping the Blending Step
Unblended highlighter looks like stripes of glitter on your face. The goal is a seamless, lit-from-within glow, not obvious product placement.
Take extra time to blend, especially where your highlighter meets other makeup products. The transitions should be invisible.
Use clean brushes or sponges for blending. Dirty tools can create patchiness and prevent smooth blending.
Highlighting Oily Areas
Applying shimmery highlighter to already-oily areas makes you look greasy rather than glowy. Skip highlighter on your T-zone if you have oily skin.
If you must highlight these areas, choose a matte highlighter. These create dimension without adding shine.
Use blotting papers throughout the day before touching up highlighter. This prevents mixing oil with shimmer.
Ignoring Your Undertone
Your skin’s undertone matters tremendously when selecting where to put highlighter on face. Cool undertones with warm highlighters look unnatural and vice versa.
If highlighter looks orange or too pink on your skin, it’s probably the wrong undertone. Keep searching for the perfect match.
When in doubt, choose champagne or pearl shades. These tend to be universally flattering across different undertones.
Applying on Textured Skin
Highlighter emphasizes texture. If you have active acne, enlarged pores, or fine lines, shimmer will draw attention to these areas.
Prep your skin thoroughly with primers designed to blur texture. This creates a smoother canvas for highlighter application.
Consider using illuminating primers or subtle satin-finish products instead of heavy shimmer on textured areas.
Highlighter Application for Different Occasions
Everyday Natural Look
For daily wear, stick to subtle highlighter placement. Focus only on the upper cheekbones and inner eye corners.
Choose cream or liquid formulas in shades close to your skin tone. The effect should be barely-there radiance, not obvious shimmer.
Skip highlighter on your nose, chin, and forehead for everyday makeup. Save these placements for special occasions.
Office and Professional Settings
Professional environments require restraint with highlighter. A touch on the cheekbones and under the brow bone is sufficient.
Avoid chunky glitter or metallic finishes. Choose finely-milled, subtle highlighters with a soft sheen rather than obvious sparkle.
In 2026, matte highlighters have become popular for professional settings. They create dimension without any shimmer.
Evening and Special Events
Evening makeup allows for more dramatic highlighter application. Hit all nine high points for maximum impact under low lighting.
Layer cream and powder highlighters together for intense, long-lasting glow. This technique is called “strobing” and creates a multi-dimensional effect.
Consider using colored highlighters—lavender, gold, or even holographic finishes—for editorial or creative evening looks.
Photography and Video
When being photographed or filmed, highlighter placement becomes even more critical. Focus on areas that will catch light from the camera.
Avoid glittery highlighters for professional photography. They can create unwanted sparkle spots in images.
Apply highlighter slightly more intensely than you would for everyday wear. Cameras tend to flatten makeup, so extra dimension helps.
Bridal Makeup
Bridal highlighter should photograph beautifully while looking natural in person. This requires careful formula and shade selection.
Stick to champagne, pearl, or soft gold tones. Avoid anything too trendy or colorful that might look dated in photos years later.
Test your highlighter in various lighting conditions before the wedding day. It should look flattering in daylight, flash photography, and indoor lighting.
Seasonal Highlighter Considerations for 2026
Spring Highlighting
Spring calls for fresh, dewy highlighters. Choose liquid or cream formulas in pink, peach, or champagne shades.
Layer highlighter with blush for a youthful, flushed appearance. The combination creates a healthy, “just came in from outside” glow.
Extend your highlighter to your shoulders and décolletage as the weather warms up and you wear more skin-baring clothing.
Summer Glow
Summer highlighting is all about that sun-kissed radiance. Bronze and golden highlighters mixed with your sunscreen create a natural vacation glow.
Apply body highlighter to your legs, arms, and chest for all-over radiance. Waterproof formulas are essential for pool and beach days.
In 2026, sunscreen-highlighter hybrid products have become incredibly popular. They protect while adding a subtle glow.
Fall Warmth
Fall makeup trends favor warmer, more intense highlighter shades. Copper, bronze, and deep gold highlighters complement autumn color palettes.
Pair your highlighter with warm-toned blushes and lip colors. The cohesive warm palette creates a sophisticated fall look.
Switch from liquid to powder formulas as the air becomes drier. Powder highlighters last longer in cooler weather.
Winter Luminosity
Winter skin needs extra glow to combat dullness. Choose intense, reflective highlighters in icy or pearl tones.
Layer highlighter over your moisturizer for extra hydration and glow. Winter’s dry air requires this extra step.
Highlight strategically to combat the flattening effect of heavy winter clothing and indoor lighting.
Advanced Highlighter Techniques for 2026
The Underpainting Method
Underpainting involves applying cream highlighter before foundation. This creates the most natural, lit-from-within glow possible.
Apply cream highlighter to your high points, then layer foundation over it. The glow shines through subtly.
This technique works best with light to medium coverage foundations. Full coverage foundations may completely hide your highlighter.
Cream-Over-Powder Technique
For maximum intensity and longevity, apply cream highlighter first, then layer powder highlighter on top.
This layering creates a multi-dimensional effect that lasts all day. The cream provides staying power while the powder adds extra shimmer.
Blend carefully between layers to avoid patchiness. This technique requires practice but delivers stunning results.
Mixing Highlighter with Other Products
In 2026, mixing highlighter has become an art form. Add liquid highlighter to your foundation for all-over glow.
Mix highlighter with your body lotion for radiant arms and legs. This creates a subtle, natural-looking sheen.
Combine highlighter with lip gloss for extra-dimensional lips. This trend has exploded on social media.
Wet Application Method
For ultra-intense highlight, spray your brush with setting spray before picking up powder highlighter. This creates a metallic, almost wet-looking finish.
This technique is perfect for editorial looks, special events, or when you want maximum drama. It’s too intense for everyday wear.
Allow the wet highlight to dry completely before touching your face or applying additional products.
Troubleshooting Highlighter Problems
Highlighter Looks Chunky or Patchy
Chunky highlighter application usually means you’re using too much product or your skin isn’t properly prepped.
Exfoliate regularly to create a smooth canvas. Apply moisturizer and primer to fill in pores and fine lines.
Use a damp beauty sponge to tap and blend away any chunky areas. The moisture helps smooth out the product.
Highlighter Disappears Quickly
If your highlighter fades within hours, you’re likely not using the right formula for your skin type.
Oily skin needs powder formulas set with setting spray. Dry skin needs cream formulas topped with powder highlighter.
Prime your skin properly before applying highlighter. A good primer creates grip and extends the wear time.
Highlighter Emphasizes Texture
When highlighter makes your pores or fine lines more visible, your skin needs better preparation.
Use pore-filling primers on textured areas. These create a smooth surface that doesn’t catch and emphasize light.
Choose highlighters with smaller shimmer particles. Large glitter chunks settle into pores and lines, making them more obvious.
Highlighter Looks Too Glittery
If your highlighter looks more like glitter than glow, you’ve chosen a formula with shimmer particles that are too large.
Switch to finely-milled powder highlighters or satin-finish cream formulas. These provide glow without obvious glitter.
If you’re stuck with a glittery highlighter, mix it with moisturizer to dilute the shimmer and create a subtler effect.
Wrong Shade Selection
If your highlighter looks ashy, orange, or just “off,” it’s the wrong shade for your undertone.
Swap it for a different shade or mix it with another highlighter to create a custom color.
Use the wrong-shade highlighter on your body instead of your face. It might work better on areas with different coloring.
Highlighter Tools and Application Methods
Fan Brushes
Fan brushes are perfect for light, diffused highlighter application. They pick up just the right amount of product and blend seamlessly.
Use fan brushes for powder highlighters on large areas like cheekbones. They prevent over-application and create a natural finish.
In 2026, synthetic fan brushes have become preferred over natural hair. They’re easier to clean and work better with cream products.
Fluffy Tapered Brushes
Tapered highlighting brushes offer precision and blending in one tool. They’re versatile for both powder and cream formulas.
These brushes work beautifully for detailed work like highlighting under the brow bone or on the cupid’s bow.
Clean your highlighting brushes weekly to prevent buildup. Dirty brushes create patchy, uneven application.
Beauty Sponges
Damp beauty sponges are ideal for cream and liquid highlighters. They create a seamless, skin-like finish.
Press and roll the sponge rather than dragging it. This deposits product without disturbing your base makeup.
Replace beauty sponges every 3 months. Old, deteriorating sponges harbor bacteria and don’t blend as well.
Your Fingers
Your fingertips are underrated tools for highlighter application. Body heat melts cream and liquid formulas into your skin beautifully.
Use your ring finger for delicate areas like the inner eye corners. It has the lightest touch of all your fingers.
Wash your hands before and after using them for makeup. Clean application prevents breakouts and infections.
Vegan and Cruelty-Free Highlighter Options in 2026
The beauty industry has made tremendous strides in ethical formulations. In 2026, nearly every major brand offers vegan and cruelty-free highlighter options.
Look for certifications from PETA, Leaping Bunny, or other recognized organizations. These verify that products haven’t been tested on animals.
Vegan highlighters perform just as well as traditional formulas. Modern technology has eliminated the need for animal-derived ingredients.
Many indie brands specialize in clean, ethical highlighters with innovative formulas. Supporting these companies encourages industry-wide positive change.
Check ingredient lists carefully. Some products claim to be vegan but contain beeswax, carmine, or other animal-derived ingredients.
Budget-Friendly vs. Luxury Highlighter Comparison
Drugstore Highlighters
Drugstore highlighters have become incredibly sophisticated. Brands like e.l.f., Wet n Wild, and Maybelline offer excellent quality at low prices.
The main difference between budget and luxury is often packaging and marketing rather than actual performance.
Drugstore highlighters allow you to experiment with different shades and finishes without significant financial investment.
Look for sales and coupons to score high-quality drugstore highlighters for even less. Building a collection becomes affordable.
Mid-Range Options
Mid-range brands ($20-$40) offer great quality with better packaging and more refined formulas than drugstore options.
These highlighters often have better color payoff and more sophisticated finishes. They’re worth the investment if you wear highlighter daily.
Brands in this category include NYX, Makeup Forever, and Urban Decay. They balance quality and affordability perfectly.
Luxury Highlighters
Luxury highlighters ($50+) offer the most refined formulas, beautiful packaging, and exclusive shades.
The difference in performance may be subtle compared to mid-range options. You’re often paying for prestige and packaging.
If highlighter is your signature product, investing in one luxury option can be worthwhile. Choose a versatile, everyday shade.
The Future of Highlighter: 2026 Trends and Beyond
Smart Highlighters
In 2026, tech-enhanced highlighters have emerged. These products adapt to your skin’s pH and moisture levels for custom color.
Some highlighters now contain skincare actives that improve skin texture over time. Makeup with benefits is the new standard.
Temperature-reactive highlighters change color based on your body heat. These create unique, personalized effects.
Sustainable Packaging
Refillable highlighter compacts have become mainstream. Buy the case once, then purchase refills to reduce waste.
Brands are using biodegradable glitters and sustainable mica sources. Ethical sourcing is no longer optional.
Plastic-free packaging made from bamboo, glass, or metal is the new luxury. Consumers demand sustainability.
Customizable Shades
Several brands now offer in-store machines that create custom highlighter shades. Input your skin tone and desired finish for a personalized product.
Mix-your-own highlighter kits allow you to blend different shimmers and bases at home. Customization is trending.
AI skin analysis apps recommend the perfect highlighter shade based on your photo. Technology meets beauty.
Holographic and Color-Shifting Effects
Duochrome and holographic highlighters have moved from editorial to everyday. These multi-dimensional products shift colors in different lighting.
Brands are creating highlighters that look different in natural versus artificial light. This adds interest and versatility.
Color-shifting technology allows one product to work across multiple skin tones. These “universal” highlighters are game-changing.
Frequently Asked Questions About Where to Put Highlighter on Face
What is the best place to put highlighter on your face?
The best place to put highlighter is on the upper cheekbones, as this is where light naturally hits and creates the most flattering lifting effect. Start from the apple of your cheeks and sweep upward toward your temples in a “C” shape for maximum impact.
Can you wear highlighter without foundation?
Absolutely! Highlighter looks beautiful on bare skin for a natural, dewy look. Simply apply moisturizer, let it absorb, then add highlighter to your cheekbones and cupid’s bow for effortless radiance that’s perfect for casual days or no-makeup makeup looks.
Where should you not put highlighter on your face?
Avoid applying highlighter to the center of your cheeks, under your cheekbones, directly on acne or texture, or the tip of your nose. These areas either don’t naturally catch light or will emphasize features you want to minimize.
Should highlighter go on before or after foundation?
Highlighter typically goes on after foundation for the most common application. However, the “underpainting” technique involves applying cream highlighter before foundation for a more natural, lit-from-within glow that looks like your actual skin.
What’s the difference between powder and cream highlighter?
Powder highlighter works best for oily skin, provides buildable coverage, and lasts longer throughout the day. Cream highlighter suits dry skin, creates a dewy finish, blends seamlessly, and looks more natural but may require touch-ups on oily skin.
How do you choose the right highlighter shade for your skin tone?
Choose highlighter based on your undertone: cool undertones (pink/blue veins) suit silver and pink shades, warm undertones (green veins) look best in gold and bronze, and neutral undertones can wear most shades. Always test in natural light before purchasing.
Can you use highlighter on your body?
Yes! Body highlighter on collarbones, shoulders, legs, and décolletage creates a beautiful, cohesive glow. Use larger, more pigmented formulas designed for the body, as face highlighters may be too subtle for larger surface areas.
How much highlighter should you apply?
Start with a small amount and build gradually—less is always more with highlighter. You should be able to see the glow in natural light without it looking like obvious shimmer or stripes of product on your skin.
Does highlighter work on mature skin?
Highlighter works beautifully on mature skin when applied correctly. Choose cream or liquid formulas that don’t settle into fine lines, avoid glittery finishes, focus on the upper cheekbones and cupid’s bow, and skip areas with visible texture.
How long does highlighter last on the face?
Powder highlighter lasts 6-8 hours on average, while cream formulas last 4-6 hours. Setting spray extends wear time, and layering cream under powder creates the longest-lasting effect—up to 12 hours for special events.
Conclusion
Mastering where to put highlighter on face transforms your entire makeup routine and enhances your natural beauty effortlessly.
From the essential upper cheekbones to the subtle cupid’s bow, each placement serves a specific purpose in creating dimension and radiance.
The key to flawless highlighting lies in understanding your unique face shape, selecting formulas that complement your skin type, and choosing shades that harmonize with your undertone.